


Camel Back (and hump) Walk
The Camel Back walk is not for the faint-hearted, but the views at the top are spectacular, particularly if you are prepared to clamber up the rocks to the summit. Along with this walk, we also incorporated a walk to Nil Desperandum Hut; perhaps the best-preserved and maintained hut and one of the few that is available to book for overnight stays. For details of the Nil Desperandum walk, please go to that particular page.
Walk Rating: Hard. From the carpark to the peak of Camel Hump is a bit over eight kilometres, of which at least seven kilometres is all uphill. Parts of the walk are reasonably steep. Coming from Camel Back to Nil Desperandum is reasonably easy as it's all downhill. If you walk only from the carpark to the hut, the walk is undulating and reasonably easy. 16 Kilometre return.

Image 1 - The magnificent and spectacular views from Camel Hump looking to the south -west.
Directions: Drive to Point Hut Crossing and continue over the bridge along Point Hut Road until you come to the T-intersection. Turn right onto Tidbinbilla Road and follow the road for about eight kilometres and you will see the entrance road (on your left) to Tidbinbilla Nature Reserve. Turn left into Tidbinbilla and follow the road past the visitors center until you come to the first intersecting road, then turn right. Follow the road past the playground and picnic areas and continue to the right. Park in the small carpark on the left-hand-side, and you will see the start of a walking track in front of the carpark.
The Tidbinbilla Visitors Centre opens at 7.30am each day, and you are required to pay a small fee if you are taking your car into the reserve. The fees raised go towards maintenance and upkeep of the reserve - a very worthy cause!
Attached to the right is the walking track map of Tidbinbilla. You will see that there are a lot of different routes you can take, and ours is highlighted in red. Total distance of the walk was 21.5 kilometres.
The Walk: This is a great ACT bushwalk but, as mentioned previously, not for the faint-hearted! It is what I would describe as a 'slow burn' from bottom to top, pretty much all incline.
After parking and slinging our packs on, we set off through the picturesque lower grounds of the Tidbinbilla Nature Reserve. The first part of the track took us across a gently flowing mountain stream, which accompanied us along the track until we came to the first fire access trail. It was such a pleasant way to start a walk, but once we hit the fire access trail the climb commenced! Funny how your pack suddenly feels heavier going uphill.
As we climbed the first hill, we were greeted by some of the abundant and specatcular parrots that live in the region. After stopping for a couple of photographs (Images 2, 3 and 4) we pushed on and, as we got higher, I could see our destination in the distance, way above us (Image 5).
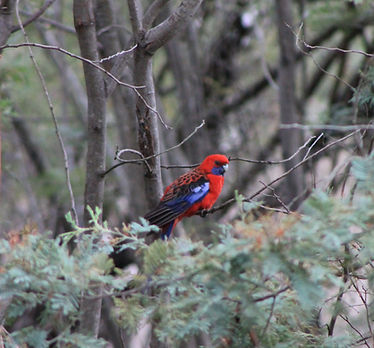
Image 3 - Crimson Rosella


Image 2 - Eastern Rosella

Image 4 - Australian King Parrot

Apart from the effort of walking uphill, the walk itself is very rewarding. You experience a diverse range of birdlife and flora as you climb higher. The foilage becomes more dense and the eucalypts taller. We were accompanied by the aroma of the eucalyptus for much of the walk.
The bracken in the higher elevations is thriving and the native wild flowers provide a colourful contrast to the green of the bushland (Images 6, 7, 8, 9 and 10).
As we climbed further, the incline became steeper but thankfully eased slightly for the last kilometre of the walk. You begin to appreciate the views to come as you get higher, with glimpses of the valley floor below and the city of Canberra in the distance.
After covering the last kilometre, we arrived at the sign telling us this was indeed Camel Back (Image 11). The location is on the fire access road but the actual peak is further up and aptly named Camel Hump. We had gone ahead of our walking buddies, so decided to climb a little and check it out. We were rewarded with a spectacular view (Image 1).
Image 5 - About halfway along the climb and looking up towards Camel Back


Image 6 - Bracken undergrowth (a type of fern)
We sat on a rocky outcrop for a while enjoying the views, but the lure of getting to the top was too strong, so off we went. For those who want to get to the top, be aware that it is a sharp incline and, whilst not technically a climb, you have to be careful because to the left as you ascend, there are cliff faces and the way up is reasonably demanding (Images 12 and 13).
We finally arrived at the top and to our surprise, we were met with the sight of another group of (much younger) walkers, who had also ventured to the 'summit'. The summit itself does not have much in terms of views due to the thick undergrowth and trees. There is, however, a rock pile (Image 14) that has accumulated in size over the years as those making the trek to the 'summit' leave their own rock as a sign that they have achieved the climb--similar to the Camino trail in Northern Spain. Maybe next time!
TIP: For fantastic views, climb to the first rocky outcrop (you can't miss it). It is only a short disctance from the Camel Back sign and provides breathtaking views. Be careful not to go too close to the edge though. From this vantage point you also look back down the track that brings you up, and the other half of our hiking group could be seen making their way up (Image 15).
We stopped for a cuppa and a well-earned break. After sitting quietly for a while, we were surrounded by various native birds, darting in and out of the trees all around us. The group who had been on the Camels Hump 'summit' reappeared and, after saying farewell, they began their walk back down the track. We motivated ourselves to move from our chairs, packed our gear and also began making our way back down the hill towards Nil Desperandum Hut. Down felt good (Image 16)!
Image 7 - Gorse Bitter Pea

Image 8 - Cassinias

Image 9 (above left) - Bulbine Lily and Image 10 (above right) - Not sure about this shrub. If anyone knows, please put on the comments box at bottom of the homepage.

Image 11 - Camel Back and a well-earned rest.

Image 13 - The cliff faces to the south-west of Camel Hump. The trail up is to the right, by the way!

Image 15 - Almost to Camel Back.

Image 12 - The climb to the peak of Camel Hump.

Image 14 - The 'summit' and the accumulating rock pile.

Image 16 - On the way down from Camel Back and to Nil Desperandum.